
Garage golf simulator plans · DIY build guide
Build a real golf simulator in your garage for less than a foursome pays to play Pebble Beach once
You don't need a contractor, a welder or a $1,000 enclosure kit. You need a few things from the hardware store and the farm store, a radar launch monitor, and the exact numbers in these plans. Every cut, clearance and part is already worked out for you.
Get the plans for $14.99$29.99Instant PDF download · regular price $29.99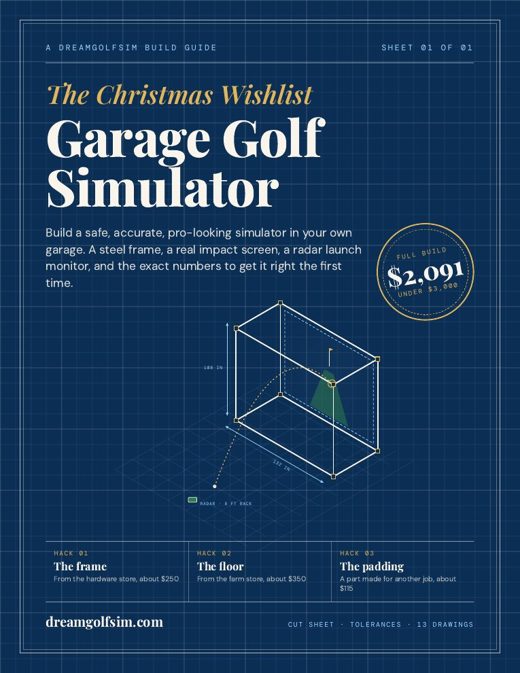
If you've been thinking about this for a while
You've watched the builds. The numbers never match.
Every build video uses a different gap between the screen and the frame, and few of them say why. One forum thread says a 9-foot ceiling is plenty. The next one says it isn't. Half the parts lists skip the floor entirely.
So the project sits. Because you know what a wrong number costs in a garage. A frame that comes up 3 inches short after you've cut all twelve pipes. A screen that bellies back into the wall every time you hit driver. A launch monitor that reads 15 yards short and you can't figure out why.
These plans put every number in one place, worked out from the screen outward, so they all agree with each other. The frame fits the screen. The screen clears the wall. The launch monitor sits where the radar can see the whole shot. You measure once, cut once, and hit balls the same weekend.
A DIY golf simulator on a budget
Three hardware-store swaps do most of the saving
Most of the money in a golf simulator goes to three things: the enclosure, the floor and the launch monitor. The first two are where a finished product costs far more than it needs to. Experienced DIY builders have used these swaps for years. The plans put all three into one build, with the math done and the parts named.
The hardware-store frame
Steel from an aisle most golfers never walk down. Twelve pieces, eight corners, three cut lengths, and no welding.
The farm-store floor
Built for a 1,200-pound animal to stand on, so it never slides under your feet. A real hitting strip drops right into it.
The $15 padding trick
A cheap part made for a completely different job snaps right onto the frame. It stops a ball from coming off bare steel and back at your face.
What the same garage bay costs other ways
| Turnkey installInstalled packages from one Arizona builder | $12,995+ |
| Boxed DIY enclosure kitScreen and frame only. No floor, no launch monitor, no projector | $999.95 |
| These plans: frame, screen and paddingThe same job the boxed kit does, from the cut sheet in chapter 5 | ≈ $631 |
| These plans: the full buildFrame, screen, padding, floor, a radar launch monitor, side netting and a short-throw projector | ≈ $2,091 |
Turnkey and kit prices are the sellers' own published prices, checked October 2026 (see our garage golf simulator guide for the sources). Build prices are typical U.S. retail from the plans' shopping list, October 2026. Pebble Beach green fee: $675 per player through March 31, 2026 and $695 after, before tax and cart. Prices move with sales.
Look inside the golf simulator blueprint
Drawings you can build from
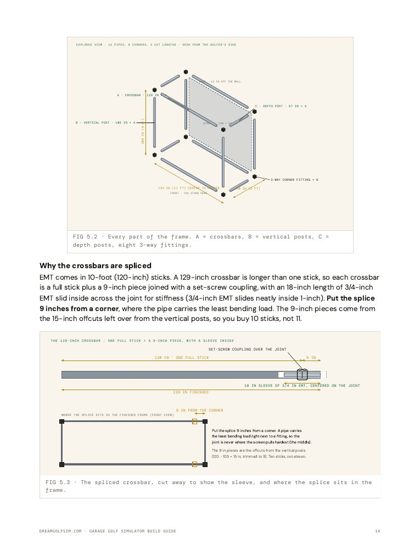
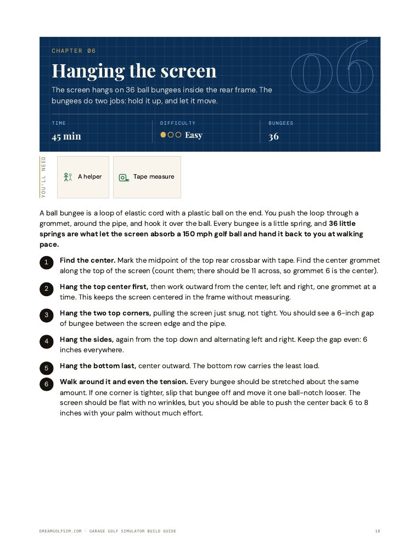
13 drawings sit in the chapters where you need them: the corner fitting pulled apart, the full frame exploded with every part labeled, the hanging order for all 36 bungees, the mat pocket in cross-section, and a to-scale plan of a two-car garage.

What you'll know before you buy a single pipe
What's inside these DIY golf simulator plans
- The 30-second rag test that tells you, with your own driver, whether your ceiling is high enough. Ch 2
- Why the ceiling in a garage is rarely the problem, and the thing hanging under it usually is. Ch 2
- The one gap behind the screen that decides whether your drywall survives the first month. Ch 3
- The two launch monitors that fit this build best, side by side, and which one is worth paying more for. Ch 9
- Exactly how far behind the ball the launch monitor sits, and the 1-inch height mistake that throws off every launch angle. Ch 3 and 9
- The full shopping list, line by line, with what to buy where and four things not to buy at all. Ch 4
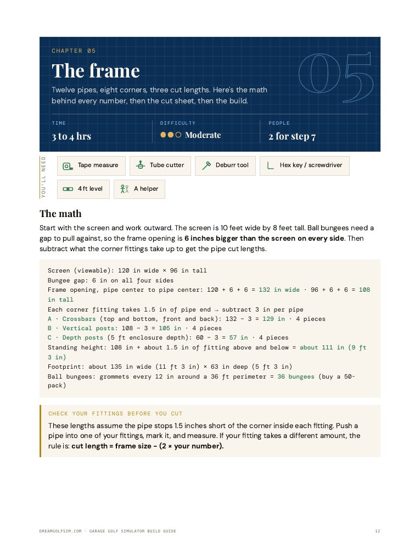
- Why one of your three cut lengths is longer than anything the store sells, and the $9 fix that keeps the joint from flexing. Ch 5
- The low-ceiling cut: one change to four pipes that drops the whole frame 9 inches. Ch 5
- Why a screen pulled drum-tight bounces balls back past the tee, and how loose is right. Ch 6
- How to set a real hitting strip dead flush into a floor that never slides. The trick for cutting it is in your kitchen. Ch 8
- Why a regular projector puts your shadow on the screen, and where a short-throw one hangs instead. Ch 10
- The five-step shakedown to run with wedges before you ever pull a driver. Ch 11
- The six problems almost every first build runs into, and the fix for each. Ch 12
Before you buy
Will a DIY golf simulator fit your garage?
Take a tape measure out there first. If your garage misses these numbers, this build won't fit, and you should keep your money.
These plans are for you if
- You have about 12 feet of clear width
- You have 16 feet of depth (20 is comfortable)
- You have 9 feet of clearance under the door track or opener
- You can use a few basic hand tools and a drill
- You'd rather spend a weekend than $13,000
Skip them if
- Your lowest point over the hitting area is under 8 feet 9 inches
- You want someone else to do the whole install. DreamGolfSim lists simulator builders by state, free to search
- You want a commercial-grade room with a camera system mounted in the ceiling
Everything you get
Garage Golf Simulator Plans
- The 35-page build guide (PDF)13 chapters, in the order you'll actually do the work. Read it on your phone in the garage or print it.Instant download
- The exact cut sheetThree cut lengths, twelve pipes, the math shown, plus the low-ceiling version. Measure once, cut once.Chapter 5
- 13 build drawingsExploded frame, corner fittings, the splice, bungee order, padding, mat pocket, launch monitor and projector placement.Throughout
- The priced shopping listEvery item, with quantity, spec and typical price, so you can see the whole budget before you spend.Chapter 4
- The garage golf wish listThe gift-sized pieces (launch monitor, projector, hitting strip and more) on one page you can text to your family.Included
- The one-page quick reference cardCuts, clearances and monitor distances. Cut it out and tape it next to the frame.Printable
Holiday price through December 26. A lot of these get built as gifts, and the people buying them need the list before the 25th. That's less than 1% of what the full build costs.
Less than 2% of what the full build costs, and less than one drywall patch.
back
Measure your garage with it first
Read the plans. Walk out to the garage and run the five measurements in chapter 2. If you don't think they're worth far more than you paid, email [email protected] within 30 days and you get every cent back. No form and no questions. Keep the PDF.
Questions people ask
Garage golf simulator plans: questions
How do I build a golf simulator in my garage?
Measure your ceiling under the door track, your width and your depth, then build a steel frame that holds an impact screen, put down a floor that won't slide, and set a radar launch monitor behind the ball. These plans give you every measurement, cut and part for a 10 by 8 foot screen in a standard garage, in the order you do the work.
How much does a DIY golf simulator cost in a garage?
The build in these plans comes to about $1,550 for the frame, screen, padding, floor, launch monitor and netting, and about $2,100 with a short-throw projector. Installed garage packages from builders start around $12,995. The plans themselves are $14.99 through December 26.
What size garage do I need for a golf simulator?
About 12 feet of clear width, 16 feet of depth (20 is comfortable), and 9 feet of clearance under the lowest thing over the hitting area, which in most garages is the door track or the opener. Chapter 2 walks you through all five measurements before you buy anything.
Are these golf simulator enclosure plans or a full build?
A full build. The enclosure is the biggest part, with an exact cut sheet and 13 drawings, but the plans also cover the floor, padding, launch monitor placement, the projector, a first-session checklist and troubleshooting.
Do I need to be handy?
You need to measure carefully and use a few basic hand tools and a drill. There's no welding, no electrical work and no drywall work. Most of the frame goes together with a hex key. Two steps go easier with a second person.
Which launch monitor do the plans use?
Chapter 9 names the two we'd pick for a garage build like this one and compares them side by side: price, what each one measures, and what the extra money gets you. Both cost a small fraction of the camera systems pro studios hang from the ceiling.
Is it a printed book?
It's a PDF you download right after checkout. It reads well on a phone or tablet and prints on standard letter paper.
What if prices have changed by the time I shop?
They will move a little. Every price in the guide is marked with the month it was checked, and the shopping list tells you what spec to look for so you can buy the right thing wherever it's cheapest that week.
Your call
Two ways this can go
Keep piecing it together
More videos and forum threads with numbers that don't agree. Maybe the build happens next year. Maybe you buy a $1,000 kit to skip the guesswork and still need a floor, a launch monitor and a plan.
Get the numbers tonight
Measure your garage this week with chapter 2. Shop from one list. Cut twelve pipes once. Hit your first ball into your own screen on a Saturday afternoon.
P.S. If someone in your house keeps asking what you want this year, the wish list page in the plans answers that. You can buy the plans, build the frame, and leave the launch monitor for them.